

How to Create an FBA Product Listing on Amazon
Creating an FBA (Fulfillment by Amazon) with a blank form is one of the most straightforward ways to set up your product listings.
In this SOP, we’ll walk you through each part, highlighting essential fields, best practices and technical requirements for accurately creating a new listing from scratch. You’ll learn how to input key product details, optimize listing attributes, and avoid potential errors.
But before we start…
A note on “un-editable” fields
Before diving into the step-by-step process, it’s important to understand which fields in Amazon’s form can become locked or require extra effort to modify once created.

You’ll notice a padlock symbol appearing next to those fields, but some don’t have them, so we just want to point them out:
Product type & Item Type Keyword
Technically these can be changed after the fact, but you’ll either have to perform a complete redrive (meaning deleting and re-listing), or make a request to change your category in Seller Central Support.
External Product ID
This can be the UPC, EAN or GTIN. Make sure you’re correctly copying and pasting these.
Seller SKU
This is a weird one as it’s often not required. It usually appears at the top of the Offer section. Once you create this, even if you save it as a draft, it becomes locked and can never be edited again. Even Amazon won’t be able to edit the SKU for you. So please be careful!
Manufacturer
Although this doesn’t technically become locked, it can cause issues if changed when editing or updating listings.
Gather your content before starting
Before you start adding the product, we’ve collected a list of the details you’ll need. These are the details that Amazon requires, which you’ll recognize as being outlined in red.
Essential info
Offer Details
Description
More Details
How to create an FBA listing with a blank form
1. Select “Add a product”
Either from the main Seller Central Menu or the Manage All Inventory menu:


2. Select the “Blank form” option
You’ll be shown this screen with a few different options. For this listing, we’ll be using the “Blank Form”. Select that, and hit the “Start” button:

3. Enter the first details
The first thing you’ll be required to enter is the item name (this is the product title that you’ve hopefully put some thought into and created an optimized canonical URL for). You’ll then be asked to confirm the Product Type/Category or select the appropriate one. Notice the padlock symbol next to the field. This means that you won’t be able to change this in the future.

4. Enter Product Identity details
Next, choose your Item Type Keyword (this is also a locked field), enter your Brand Name (or select it from the dropdown), and your External Product ID which is a GTIN, UPC, EAN or IBSN for books (another locked field).
Select the blue Next button at the bottom.

5. Fill out Description tab fields
You’ll see a new menu appear (like in the screenshot above) with the tabs Product Identity, Description, Product Details, Offer, and Safety & Compliance. They currently all have red exclamation marks next to them because they’re missing information that you’ll need to fill in.
Along the left-hand side, you’ll also notice that you can choose which Attributes to show. It’s best to either choose Recommended or All attributes. While creating your FBA listing with this blank form, you’ll notice that all the attributes that Amazon requires are outlined in red. Required fields depend on the category.
Your next task is to fill in the Description tab with the Product Description (learn more about how to write an effective product description), Bullet Points (add up to 10 depending on the category by clicking on Add More below the field), and Images.

6. Fill out Product Details information
Next, it’s time to start filling in all the required fields in the Product Details tab. The Manufacturer is another field to watch out for (even though it doesn’t have a padlock symbol next to it, it can also cause issues if changed).
Note: If you’re ever confused about what a field means, you can hover over the question mark to learn more.

⚠️ Careful with the Unit Count & Type and Size
A lot of people mess up this section and it’s an important one to enter correctly, especially considering that these measurements appear on Amazon’s search results page:

Amazon’s hover-over feature here can help you decide which details you need to input. It’s always a good idea to pick what makes your product look like the better deal. For example, if you’re selling tea bags, or dog chews, selecting the number of pieces or bags and setting the Unit Count Type as “Count”, will help the customer imagine the price per use.

Above you’ll see the 1st listing is showing price per ounce, which might not mean much for a customer. The last listing doesn’t even have anything displayed with the price, making it look very expensive.
If you enter something incorrectly or without paying attention, a customer could discard your listing before even clicking through because they’re comparing your listing to the others around. This value is also important for Amazon’s ranking because the algorithm makes a comparison between similar products to determine what is relatively cheaper. You can also do a quick search to see what your competitors are doing.

If you’re selling a multiple “pack”, you’ll also adjust the Number of Items field to reflect this. If it’s just a single unit, set this number as 1.

7. Fill out the Offer details
Enter your Seller SKU (this is one of the uneditable fields).
Set the Fulfillment Channel to Fulfilled by Amazon.

Related reading: FBM listings


Select the Offering Condition Type to New.
Set Your Price and click on the link that says “set List Price equal to your price” to set the List Price.

Since Amazon will be handling fulfillment, you’ll need to include all the Package Dimensions and Weight:

8. Enter Safety & Compliance information
For this section, there are usually a few fields that are always required: Country/Region of Origin and the Dangerous Goods Regulations. For this part of the drop down you can simple select Not Applicable.

9. Select your labelling method and enter Dangerous goods information
After you’ve double-checked everything, you can hit submit and you’ll be taken to a final screen that looks something like this:
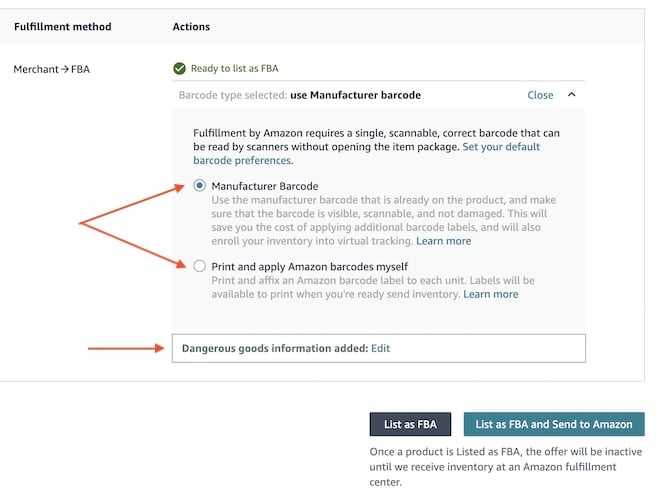
You’ll have to choose between 2 barcode types:
- Manufacturer Barcode: Uses the UPC code that is already on the product packaging. This works best if you’re the only seller of the product or brand. If there are other sellers selling the same product, then it would go into “co-mingled inventory”. This means that Amazon would fulfill the product by whichever is closest to the customer to optimize shipping and decrease wait time.
- Print and apply Amazon barcodes myself: Requires Amazon-specific label to be applied to each unit. You can do this yourself or pay Amazon to do it for a fee. This option works best if you don’t have your own UPC codes yet or can’t put them on your product.
You’ll also have to add the Dangerous goods information which usually asks about whether or not the product requires batteries, as well as a drop-down related to Dangerous Goods Regulations.
10. Hit the blue Submit button.
You’ll see a message that the listing is being created. It should appear shortly in your Inventory. Give it some time to process as the details don’t all load at once.


